Skip to content
Whichear

3D-printable development model

iPhone 13 Pro cassette v1

A complete starting point for downloading, measuring, slicing, printing and recording the first physical fit test.

Engineering baseline v1. Ready for a bench or mannequin test print. Physical fit and human use have not been approved.

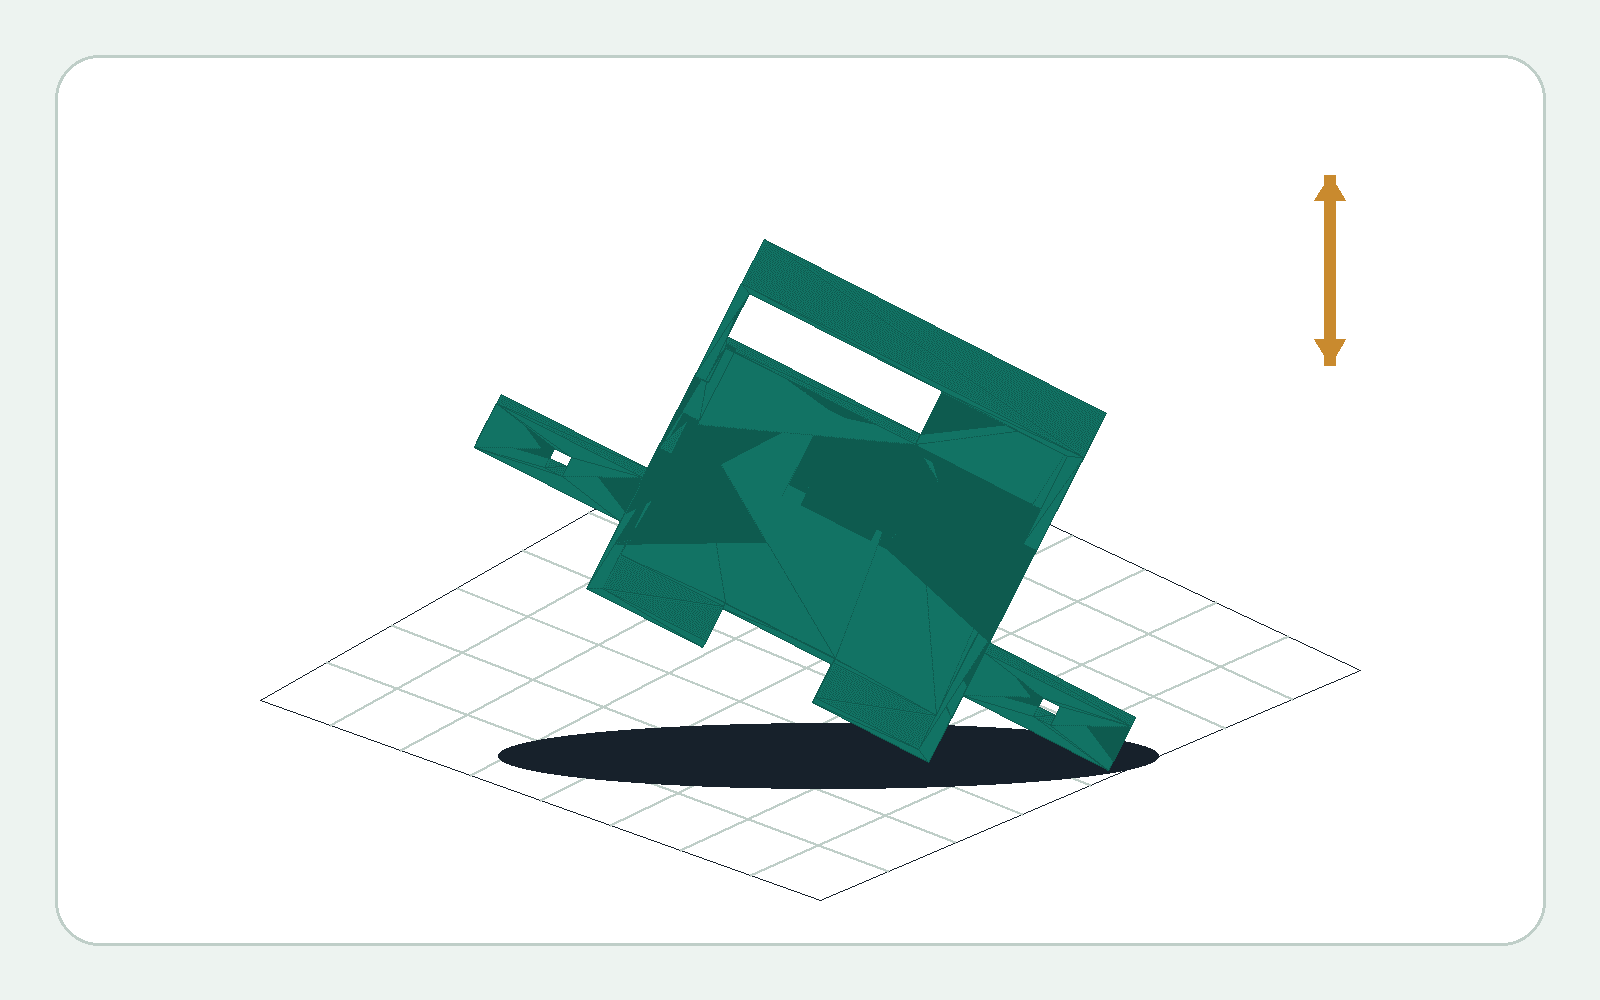
Isometric rendering of the printable iPhone 13 Pro cassette with side wings and strap slots
Nominal sample: 570 mm head circumference and 145 mm temple width. Phone not included.

Prototype status

Print to learn, not to wear

Cassette v1 passes automated mesh checks, but it has not yet been tested with two physical phones, approved slicer profiles or load and quick-release protocols. Use the first print only on a bench or mannequin and record every finding.

What you are printing

A one-piece development cassette

The model holds an uncased iPhone 13 Pro and provides a 44 mm camera keep-out, connector and side-button openings, side wings and strap slots. It is generated from the official phone envelope and fixed mechanical clearances rather than a client-uploaded CAD file.

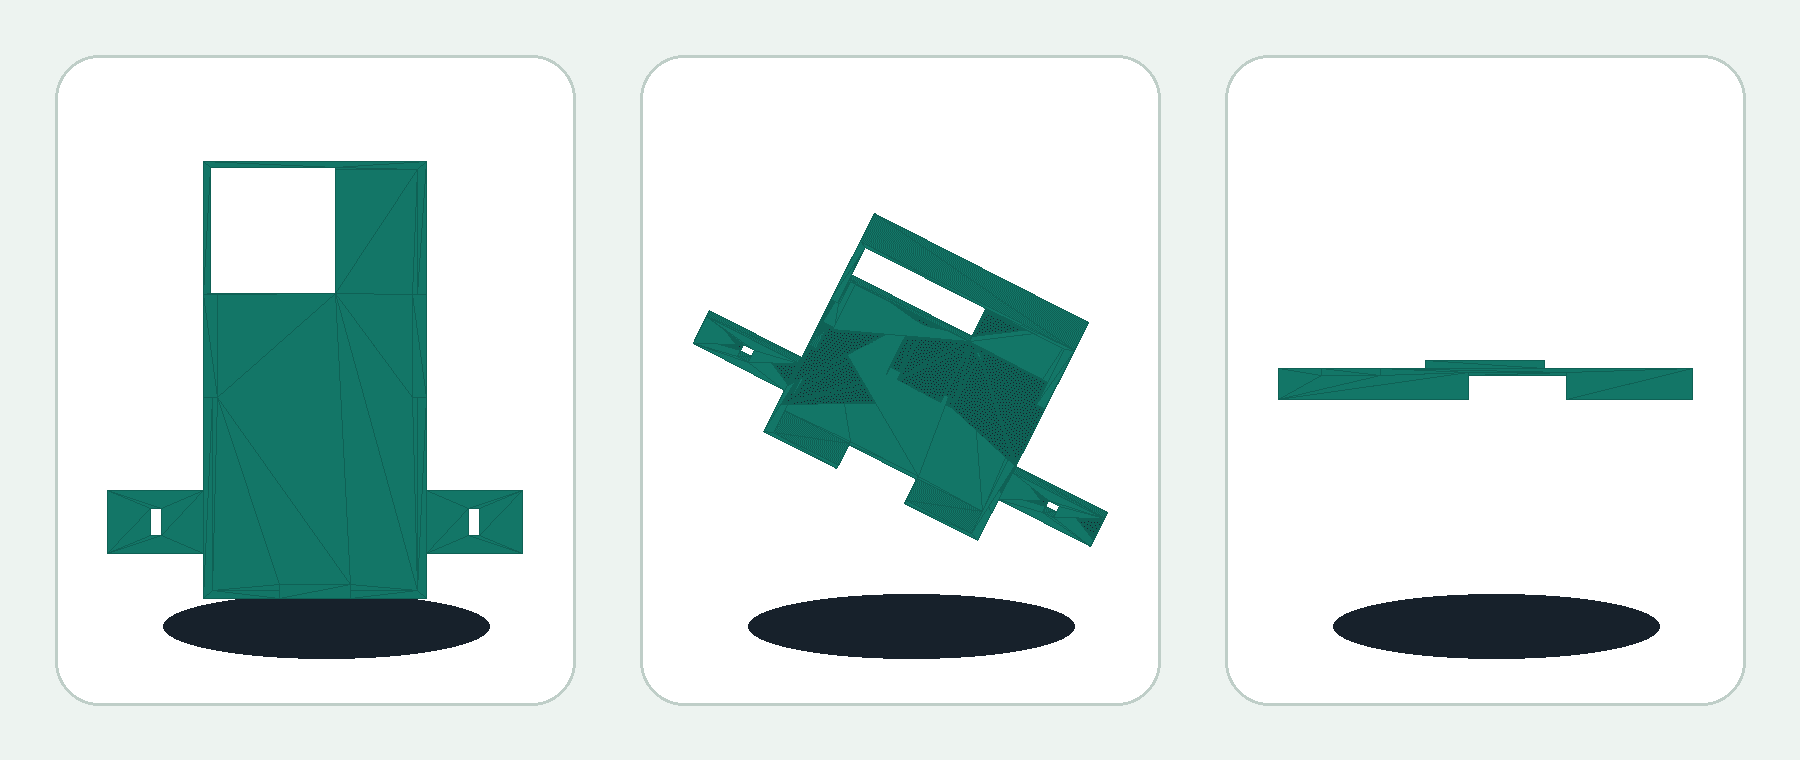
Front, isometric and side views of cassette v1
Three views of the same watertight mesh. The low side view shows the rear rails and total depth.

Nominal model facts

Phone
iPhone 13 Pro, without a case
Design version
iphone-13-pro-cassette-v1
Mesh bounds
145 × 153.31 × 14.25 mm
Phone clearance
0.30 mm on each side

Included in v1

  • 3.00 mm perimeter wall and 2.40 mm rear support
  • 44 × 44 mm camera, flash and LiDAR keep-out
  • Bottom connector and both side-button openings
  • Strap slots sized from the entered head circumference

Not included or approved

  • Phone cases, MagSafe accessories or other iPhone models
  • A validated face interface, padding, straps or full head frame
  • An approved material, slicer profile or print orientation
  • Permission to use the printed article on a person

Before generating a custom model

Take two measurements

Use a flexible, non-stretch tape and record whole millimetres. Ask another person to help if that keeps the tape level. Do not add extra slack: the generator applies its own geometry rules.

Important: measure head circumference, not head diameter. The second value is the straight outside-to-outside temple width.

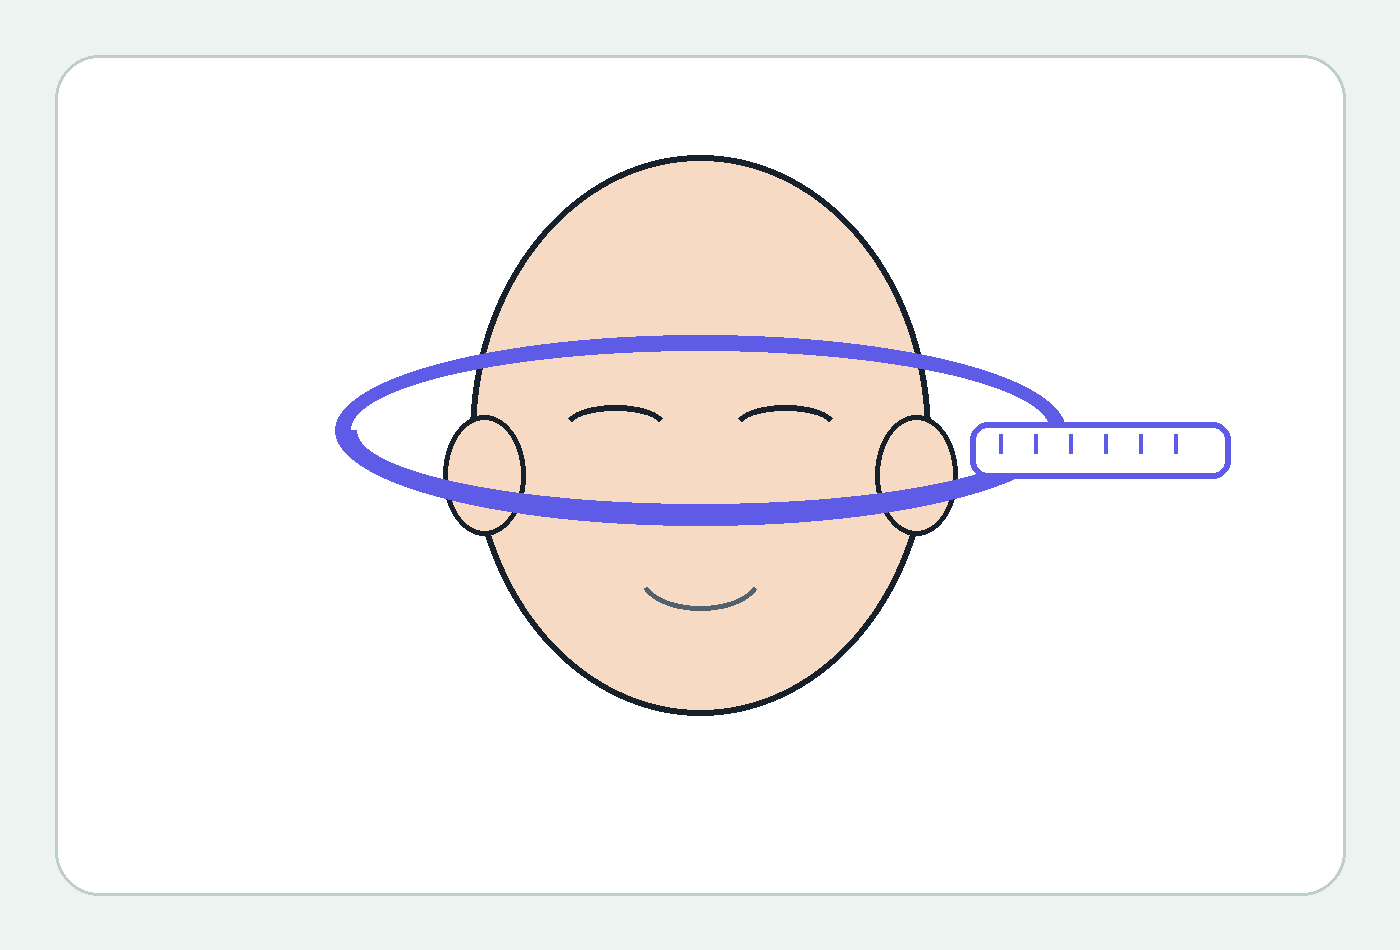
Tape running horizontally around the widest head circumference

1. Head circumference

Measure horizontally around the widest circumference, keeping the tape level and comfortably in contact with the head.

  1. Place the tape above the eyebrows and around the widest part at the back of the head.
  2. Keep it horizontal, untwisted and snug without compressing skin or hair.
  3. Read the meeting point in millimetres and repeat once.

Accepted range: 500–650 mm. Nominal sample: 570 mm.
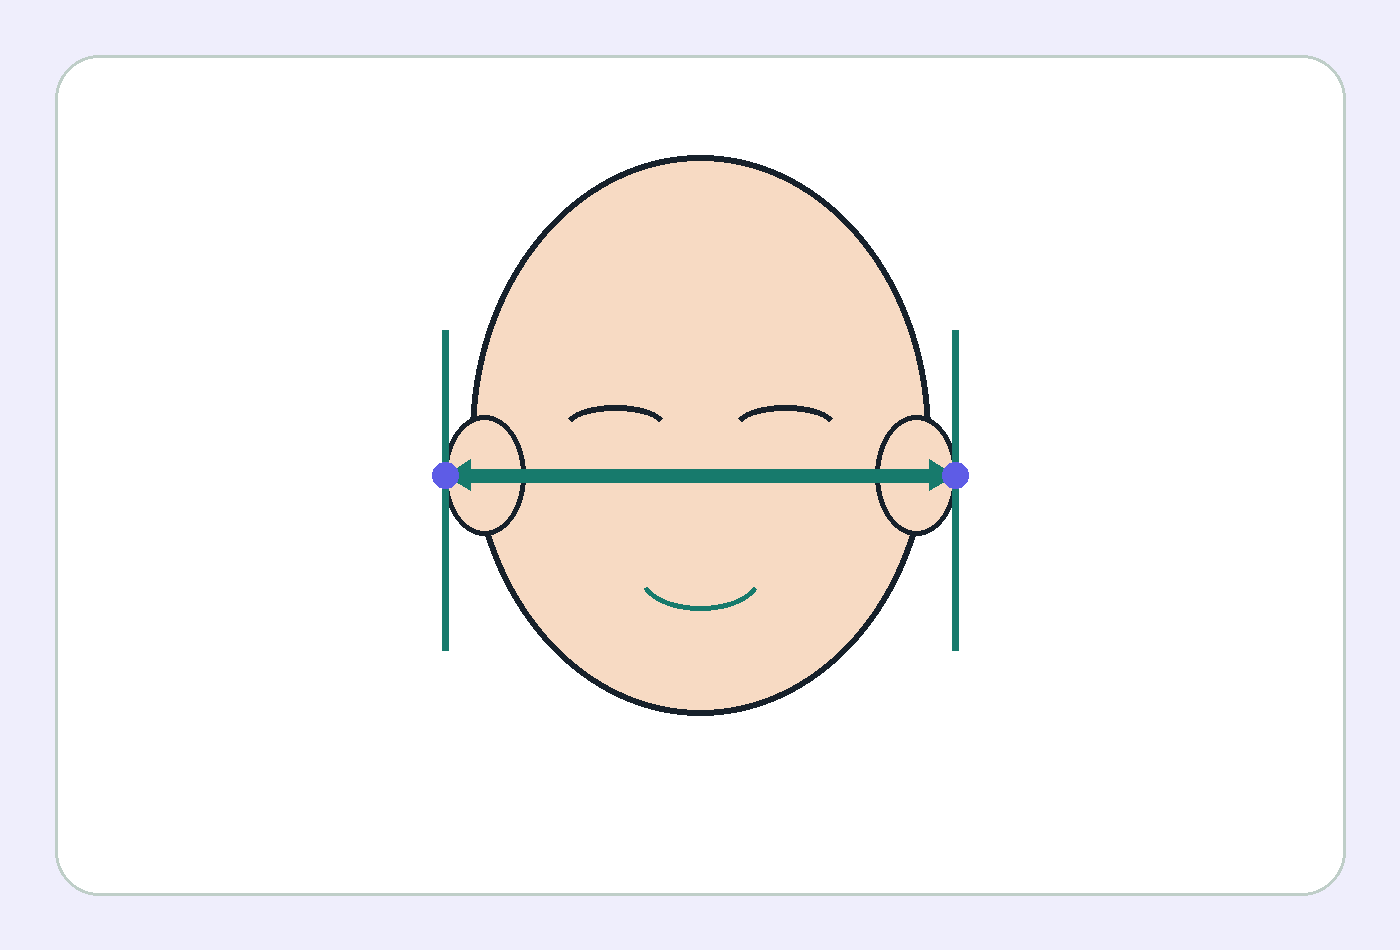
Straight outside-to-outside measurement between both temples

2. Temple width

Measure the straight distance across the head from the outside of one temple to the outside of the other.

  1. Look straight ahead and identify the widest outer points at temple level.
  2. Use a ruler or caliper horizontally; do not follow the curve of the forehead.
  3. Record whole millimetres and repeat once.

Accepted range: 120–170 mm. Nominal sample: 145 mm.

If repeated readings differ

Repeat the measurement before generating a model. Do not average obviously different readings caused by a tilted tape or a curved measurement across the forehead.

What v1 calculates now

Check the current measurement mapping

Change both values to see exactly which dimensions the current generator changes. This preview explains v1; it does not prove anatomical fit.

Calculated v1 geometry

Full wing span
145 mm
Each wing extension
33.44 mm
Strap-slot height
9.4 mm

templeSpan = templeWidth

wing = (templeWidth − 78.12) ÷ 2

slotHeight = 8 + (headCircumference − 500) ÷ 50

The public 3MF/STL remains the fixed 570/145 mm sample. Never resize that file: scaling would also change the phone cavity.

Engineering review rejected circumference-to-slot height as an unvalidated fit rule. Use this calculation only to understand v1; v2 needs a fixed strap BOM and physical fit data.

First test print

Prepare the file in a slicer

Prefer the 3MF file because it declares millimetres explicitly. STL is supplied as a fallback and must also be imported in millimetres at 100% scale.

Cassette model being prepared above a gridded printer bed
Orientation and supports are still part of physical validation. Inspect every overhang in layer preview before printing.

Before slicing

  • Confirm the selected file is cassette v1 and the nominal 145 mm sample is appropriate for this test.
  • Remove any automatic unit conversion and keep scale at exactly 100%.
  • Check that the slicer reports about 145 × 153.31 × 14.25 mm.
  • Use a clean bed large enough for the whole part and inspect the thin rails and strap slots.

Conservative starting settings

These are starting values for a non-wearable fit prototype, not an approved production profile. Adjust for the printer and material, then record every change.

Material
Black PETG for the first mechanical bench fit
Layer height
0.20 mm or finer
Perimeters
At least 4
Infill
20% starting point
Scale
100%, millimetres
Supports
Decide from layer preview; record use

Print sequence

  1. 01

    Import

    Open the 3MF, confirm units and compare the reported bounds with this page.

  2. 02

    Inspect

    Rotate the part, choose a stable orientation and check rails, lip, openings and overhangs layer by layer.

  3. 03

    Slice

    Apply the recorded prototype settings and review the estimated material, time and first layer.

  4. 04

    Print

    Stay with the printer for the first layers and stop if adhesion, warping or support placement fails.

  5. 05

    Finish

    Let the part cool, remove supports carefully and deburr without changing retention surfaces.

Do not insert the phone if

  • the part is warped, cracked, delaminated or visibly out of scale
  • there are sharp edges, strings or support remnants inside the cavity
  • camera, button or connector openings are blocked
  • the phone requires force at first contact

Controlled bench check

Test the print without wearing it

Use an uncased iPhone 13 Pro over a padded surface. Insert slowly without pressing camera glass, buttons or connector. Stop immediately instead of forcing a mismatch.

  • Verify the phone body enters evenly and can be removed without tools.
  • Confirm the camera lenses, flash and LiDAR remain completely clear.
  • Press every side button and connect the charging cable without obstruction.
  • Check that no printed surface touches or loads the camera glass.
  • Inspect rails, wings and strap slots for cracks after insertion and removal.
  • Repeat ten assembly cycles only if the first cycle is smooth and damage-free.
  • Do not perform a head-mounted or sustained-load test until the safety gates are approved.

Record the result

Note printer, material, nozzle, layer height, orientation, supports, scale, phone measurements, insertion and removal observations, defects and photos. Mark every check pass or fail.

What happens after the first print

A tolerance or geometry problem becomes a new immutable cassette version. A safety-critical miss recalls v1; the published file is never silently replaced.

Nominal test package

Download the printable files

These files are the deterministic nominal fixture for a 570 mm head circumference and 145 mm temple width. They are suitable for the first controlled print, not a personalized fit.

Cassette v1 · nominal sample

Watertight mesh, 230 triangles, millimetre units, generated by whichear-cad-v1.

3MF

3MF

Preferred for slicers. Units are embedded in the file.

Download
STL

STL

Fallback binary mesh. Import explicitly in millimetres.

Download
JSON

Manifest

Dimensions, versions, preflight report and SHA-256 checksums.

Download

Common questions

Before you print

Can the phone stay in its case?

No. Cassette v1 is dimensioned only for an uncased iPhone 13 Pro and does not support MagSafe accessories.

Will another iPhone model fit?

No model other than iPhone 13 Pro is supported. Similar-looking phones can differ at the body, button and camera keep-outs.

Can I attach straps and wear the first print?

No. The first print is for bench or mannequin inspection. The face interface, straps, loads, quick release and human-factors protocol have not passed their gates.

Why does the downloadable sample use fixed measurements?

It is a reproducible nominal fixture. The generator can create custom geometry only after receiving head circumference and temple width within the published ranges.